14. Tracks
Now that we have the SYNC_TONE track, it can be sidechained to each individual track in the project. This includes all audio and instrument tracks.
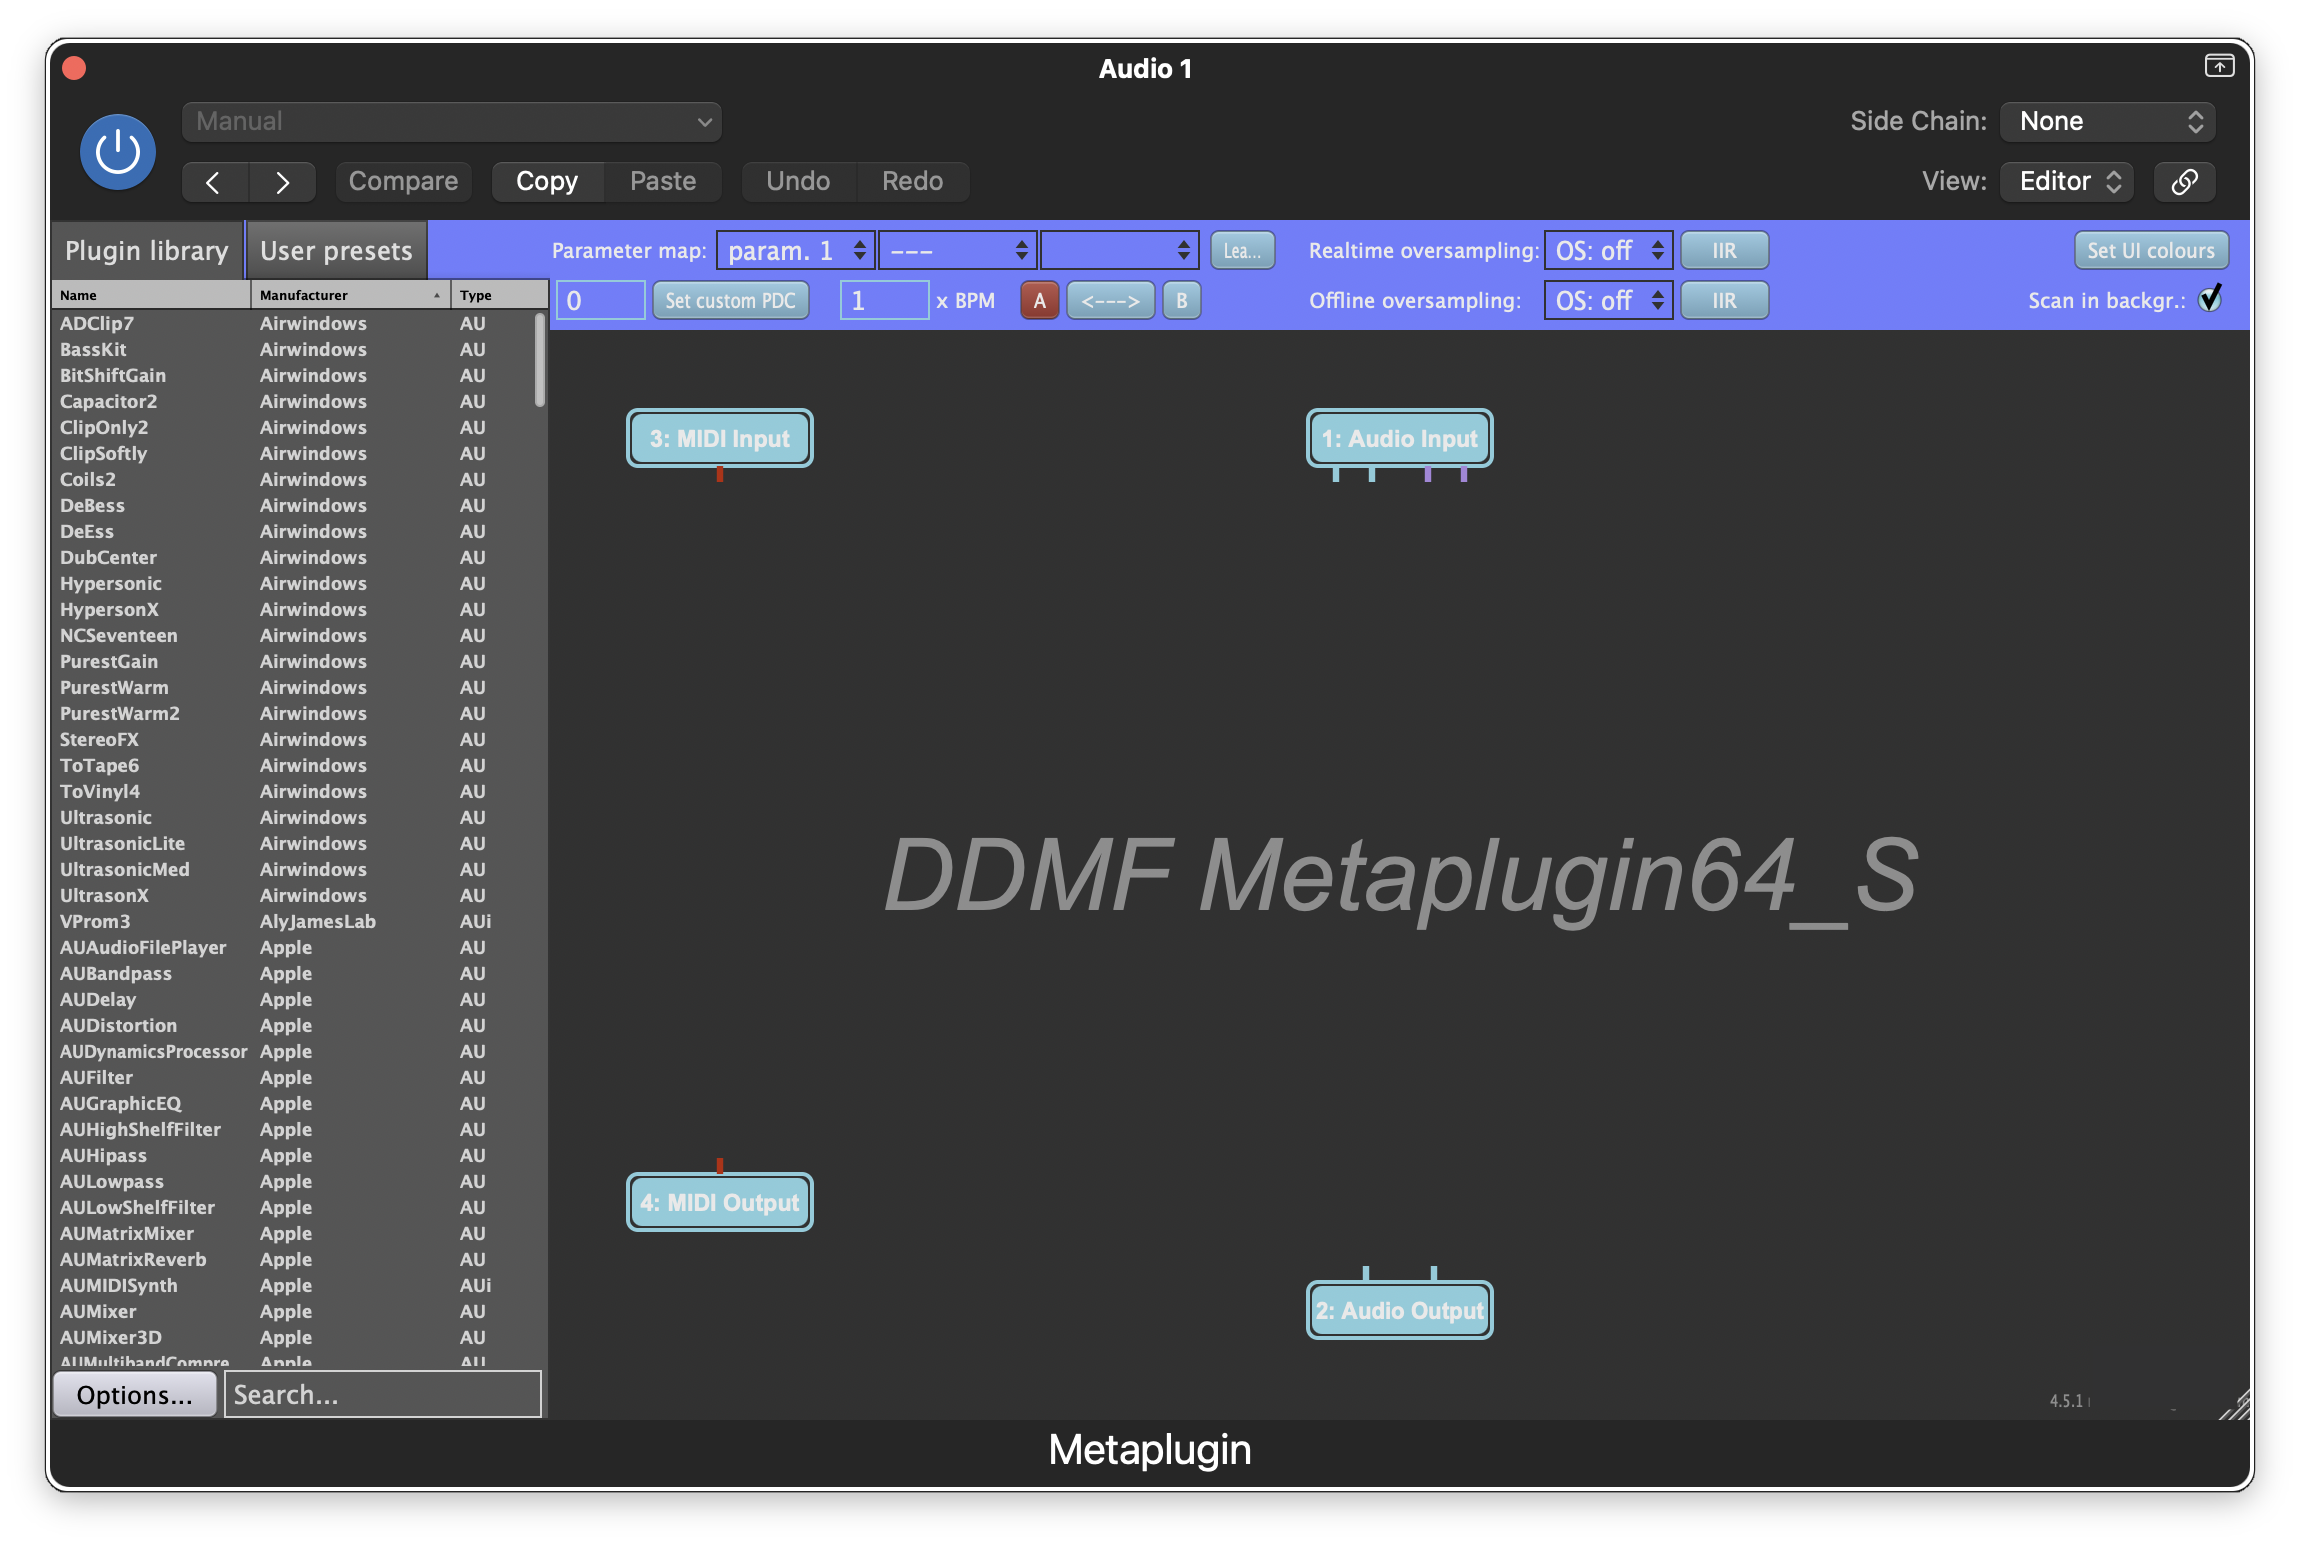
To accomplish this, we will insert an instance of Metaplugin as the first Audio FX on each track. When added to a track, Metaplugin will appear like the following:
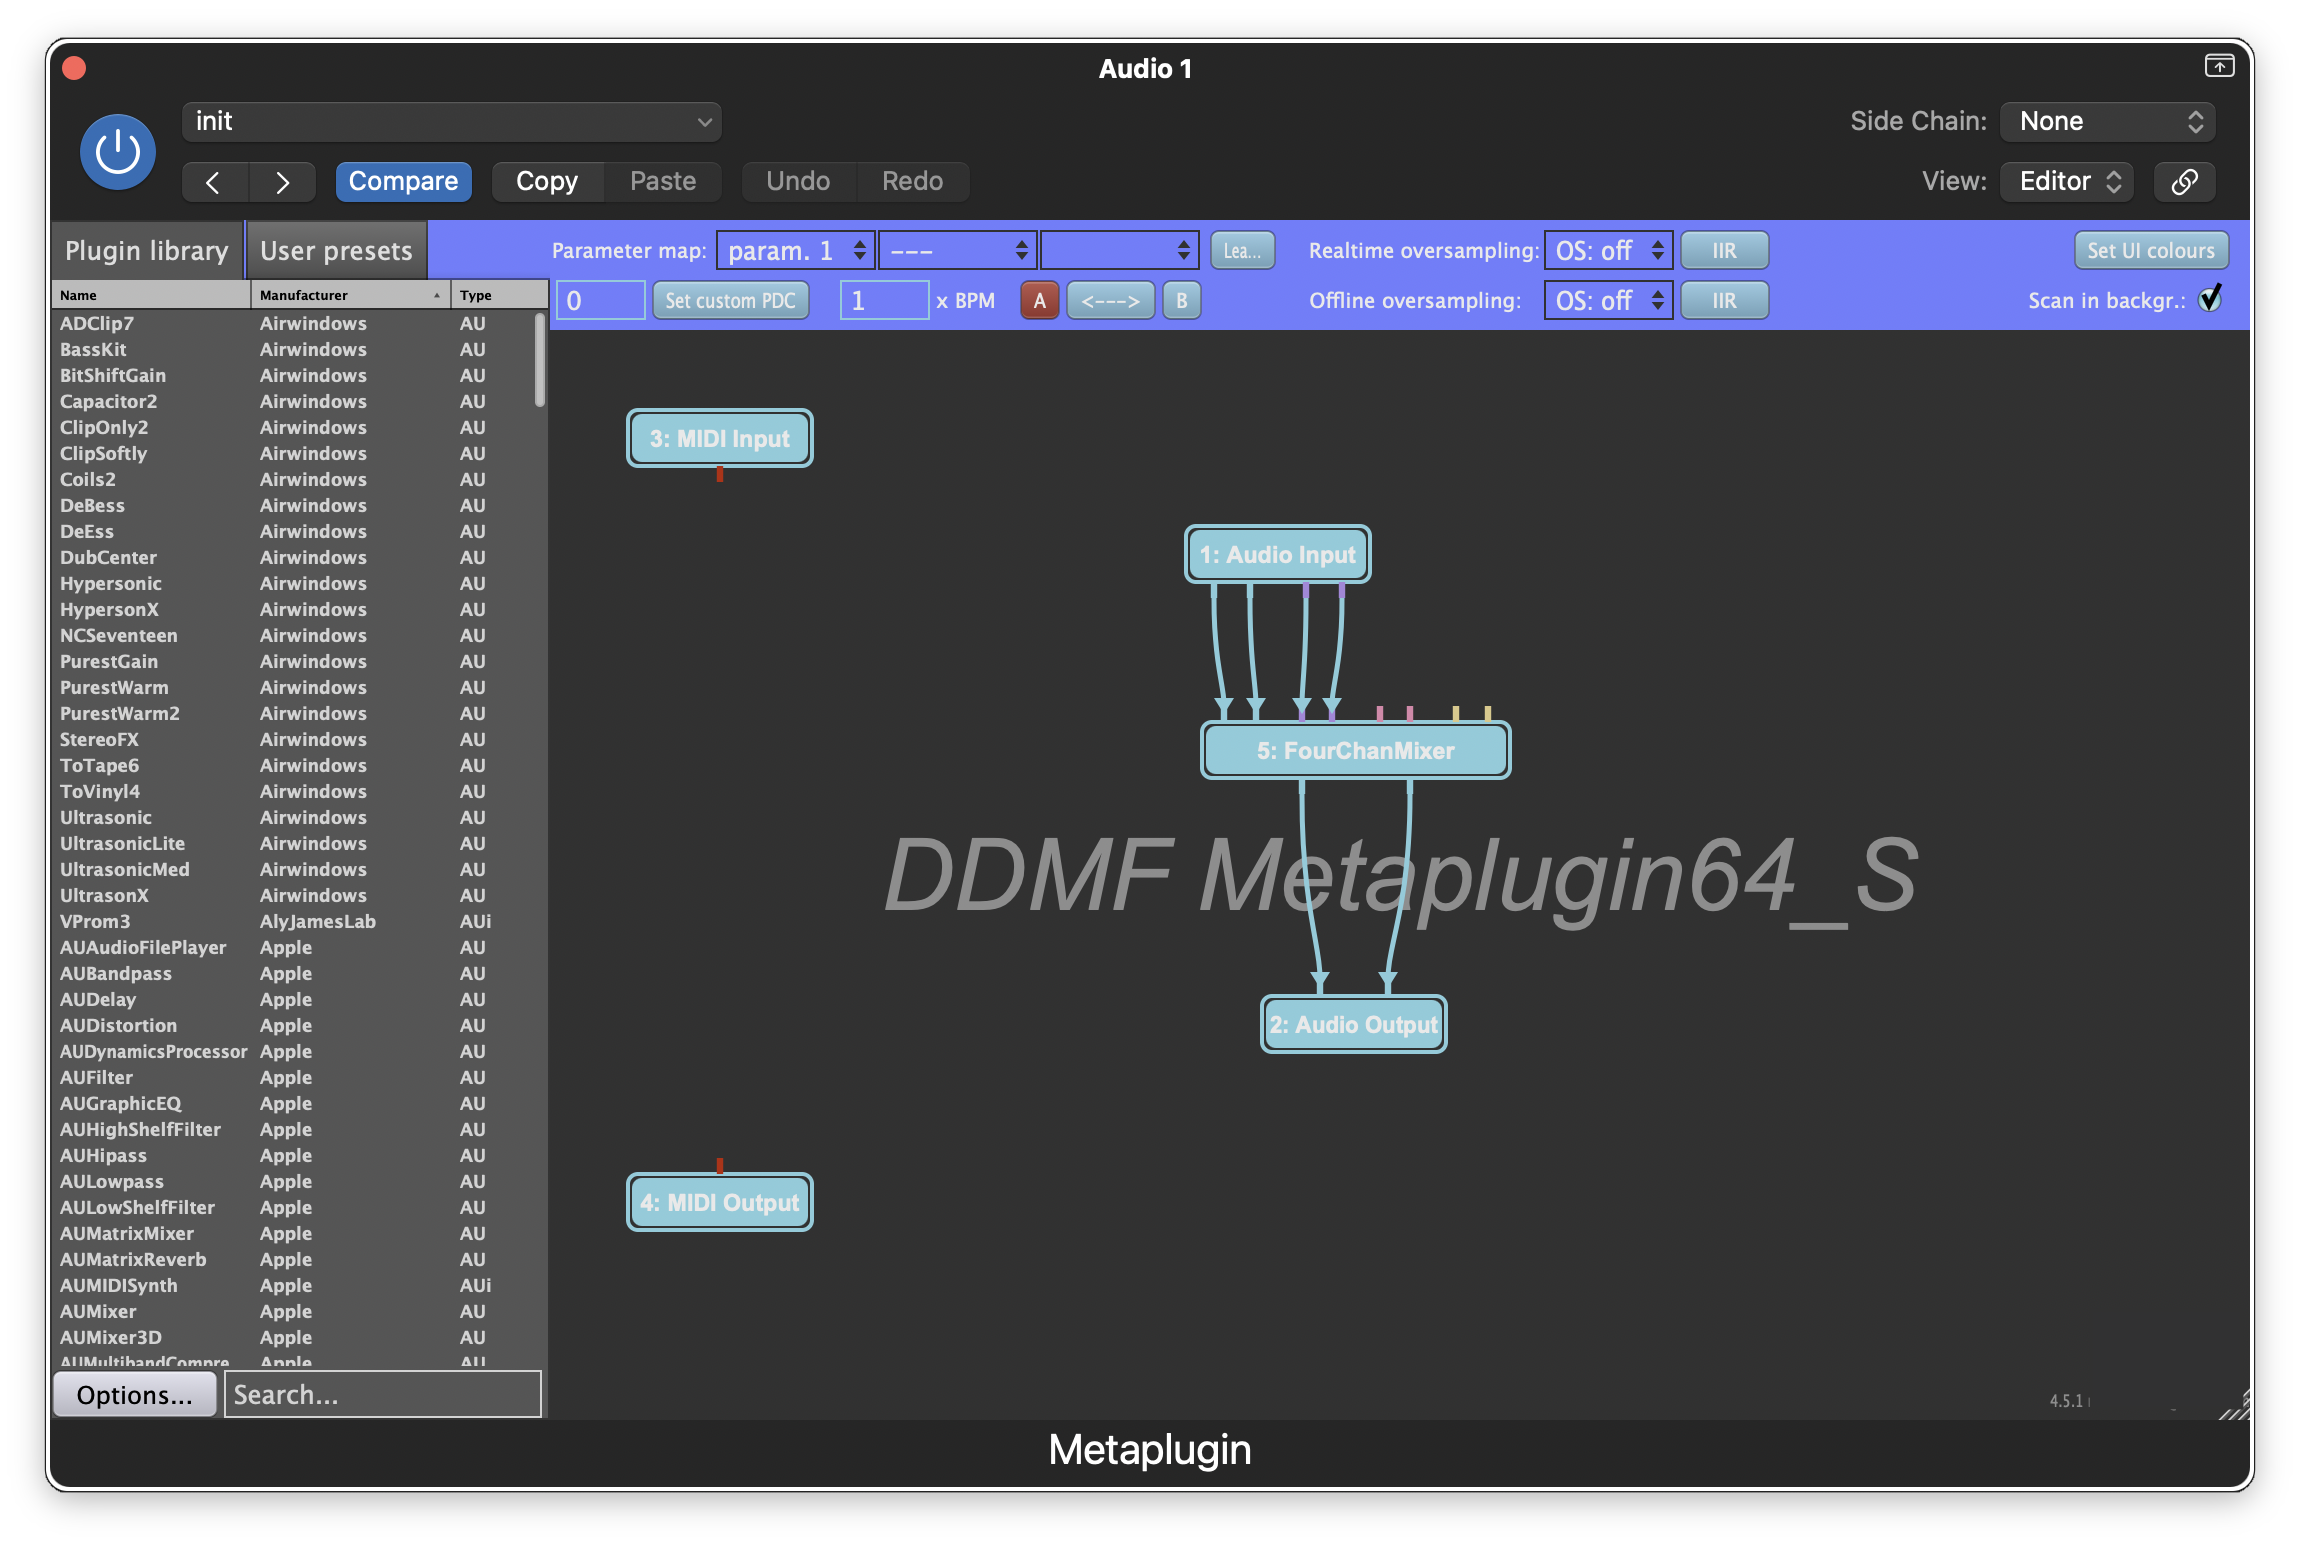
Next, right-click in the grey area of the plugin and click the FourChanMixer option. This will add a four-channel mixer to the node graph.
To make use of the synchronization tone, we are going to route the track's normal audio stream into the four-channel mixer, along with the plugin's sidechain input. To do this, connect the four pins on the Audio Input node (from left to right, pins 1-2 are the plugin's main input audio, pins 3-4 are the sidechain input) to the first four input pins of the FourChanMixer node. Then, connect the output pins of the FourChanMixer node to the pins of the Audio Output node. When connected, Metaplugin should look like the following:
Double-click the FourChanMixer node to open the mixer controls. Since we are only using the first two channels, we can mute the third and fourth channels. Additionally, we can leverage the mixer's level control to attenuate channel 2 by -80 dB:
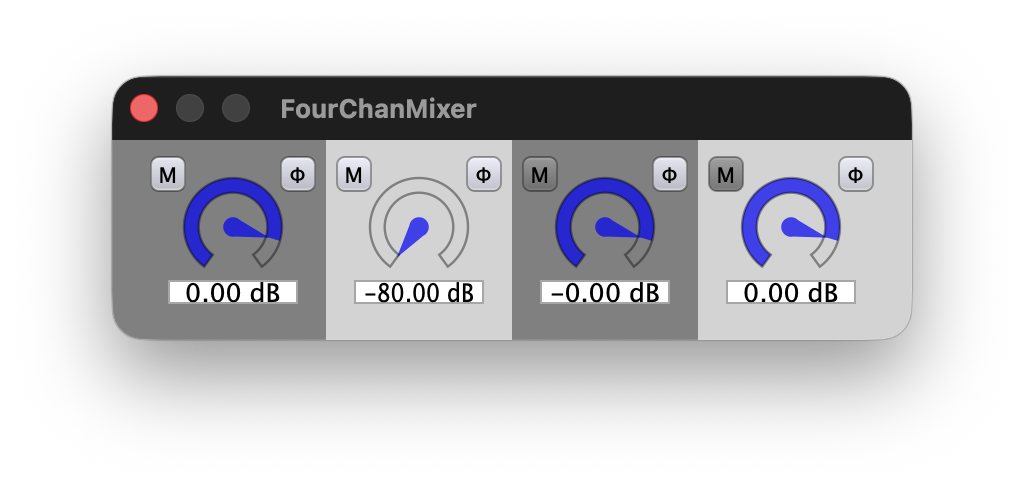
This will reduce the level of the sidechain input by an additional 80 dB for a cumulative attenuation of -272 dB.
Finally, we can connect the synchronization tone to the track by setting it as the plugin's sidechain input:
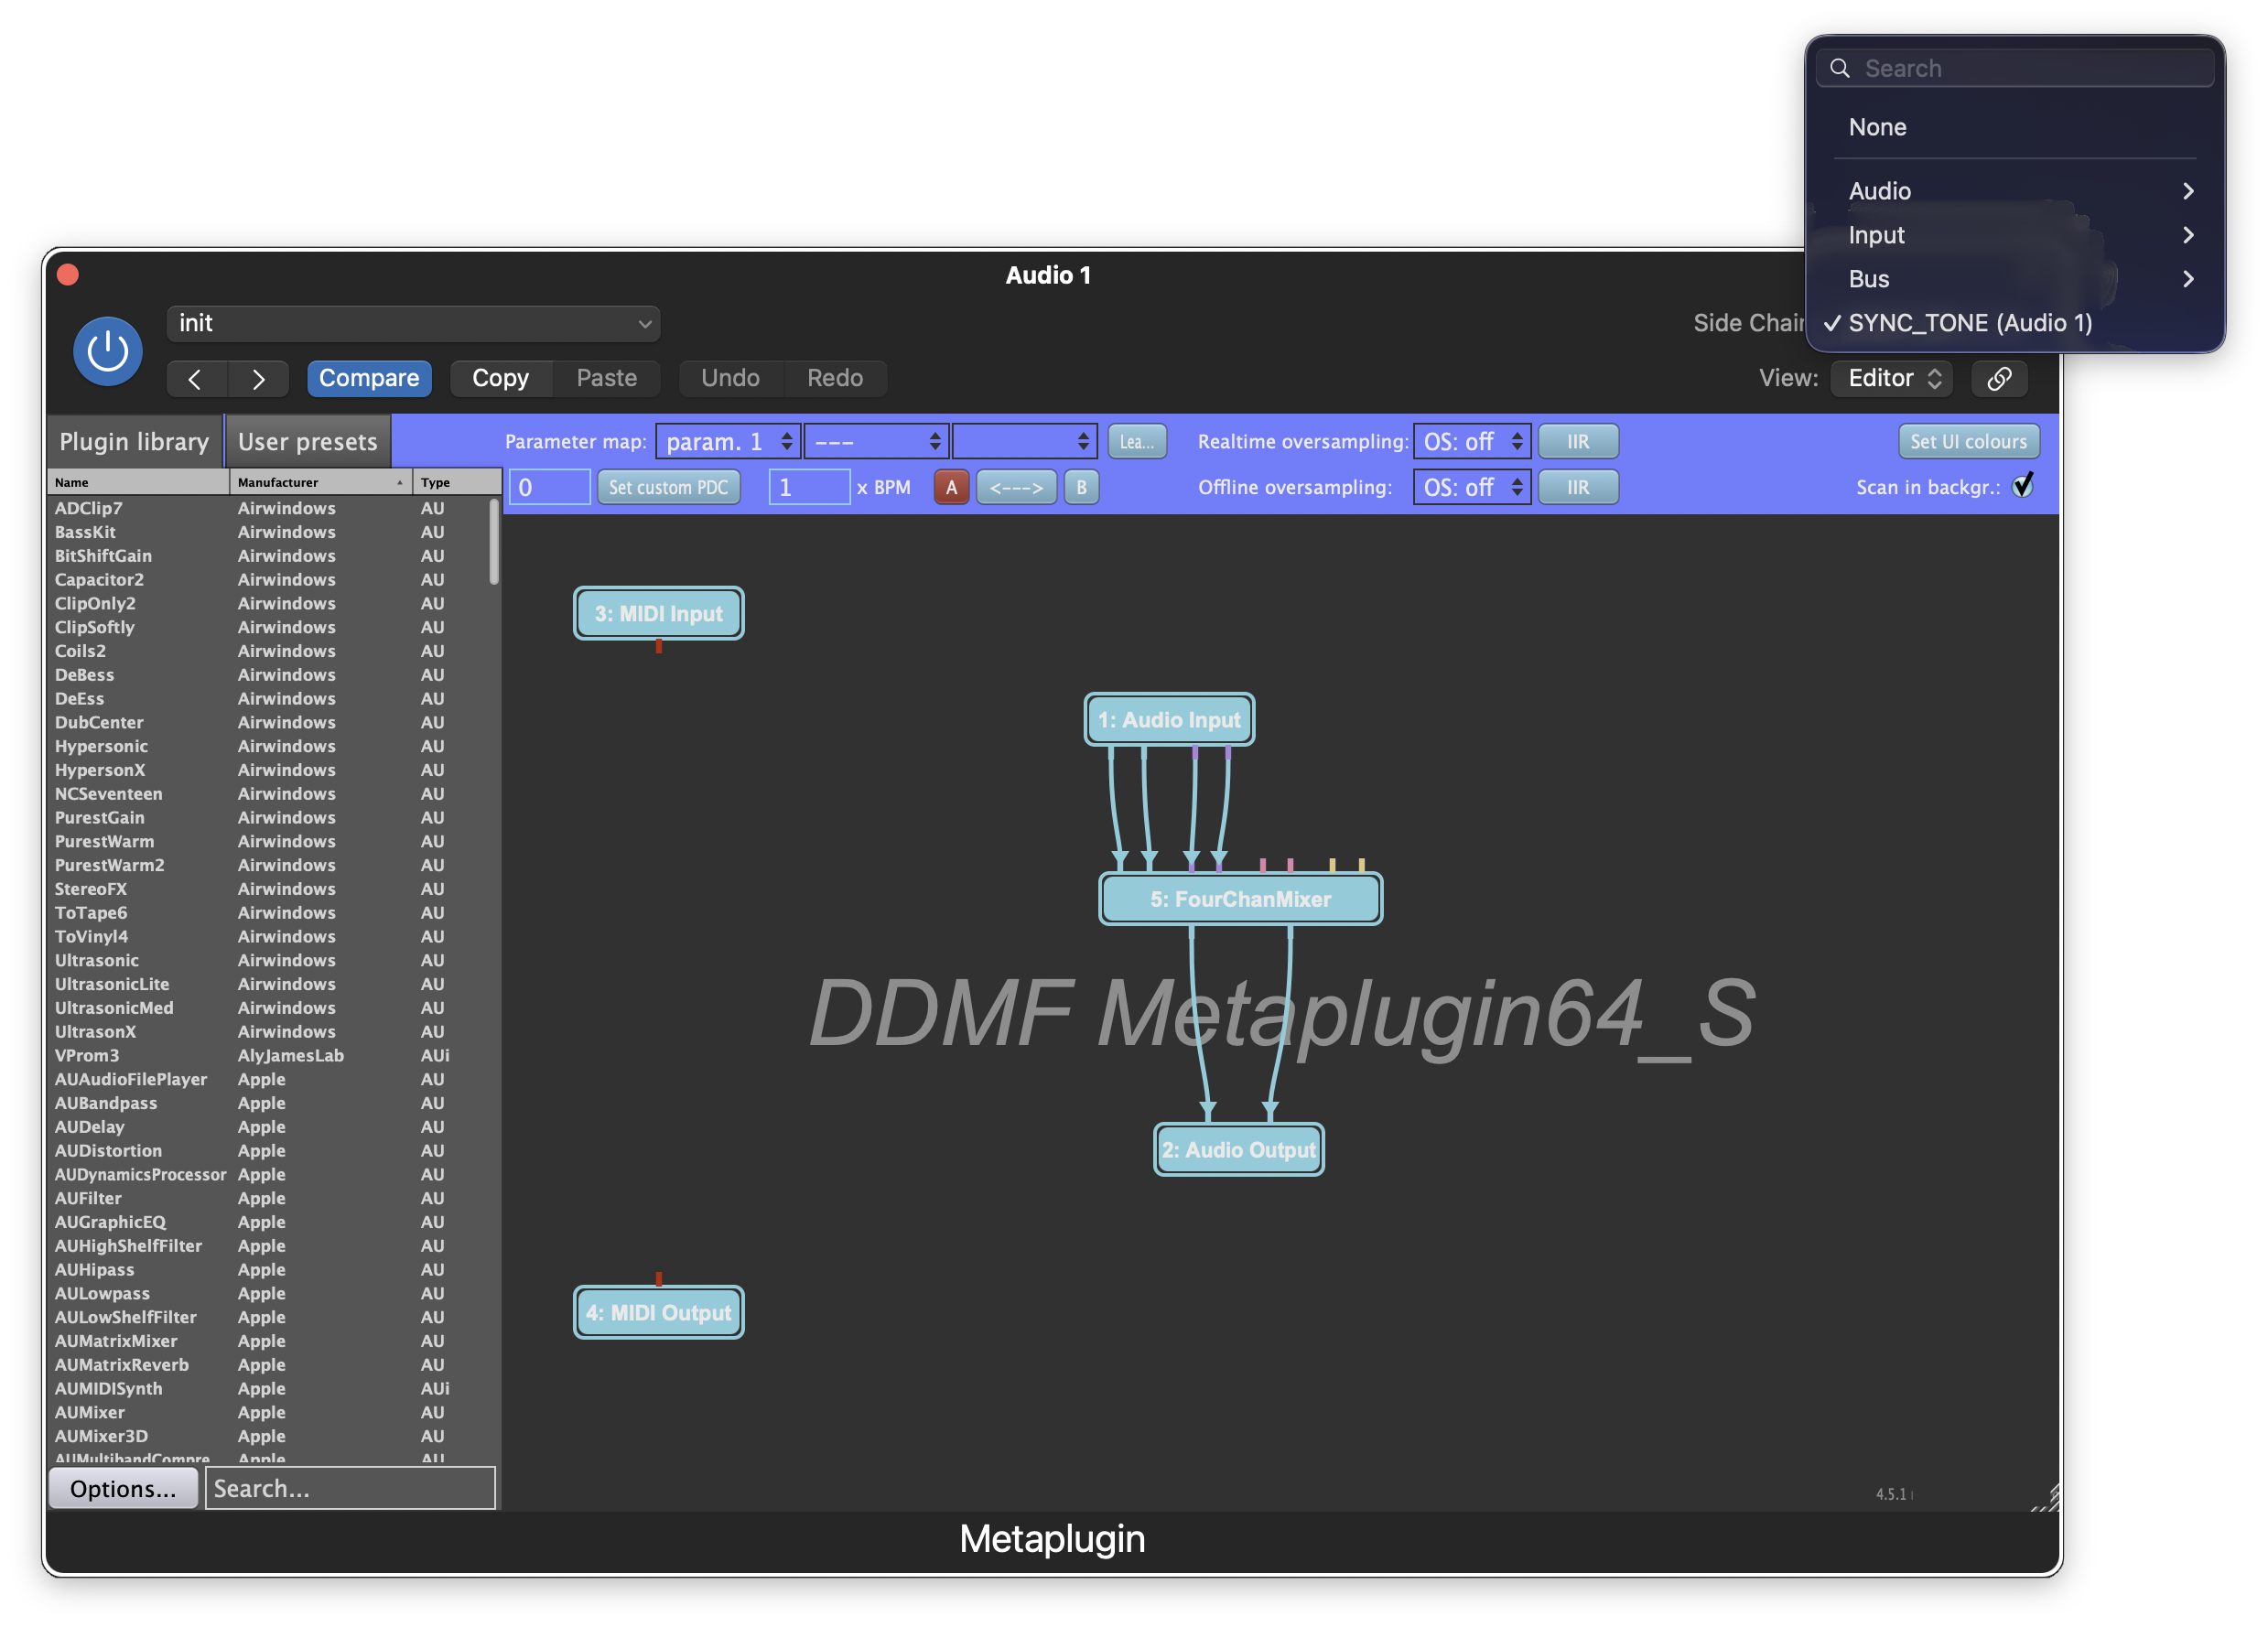
This node graph is the key to enabling use of THS in Logic Pro. By making Metaplugin's sidechain input part of the plugin's main output path, then setting the SYNC_TONE as the sidechain input, all sound passing through Metaplugin will be mixed with the synchronization tone. This specific configuration is what "tricks" Logic into keeping the channel awake and active for processing at all times.
Adding Metaplugin to Other Tracks
Once you have created and configured the first instance of Metaplugin, you can quickly add it to other tracks by holding Option (⌥), then clicking and dragging Metaplugin from one track to another. This will duplicate the node graph you previously created and automatically assign the SYNC_TONE track as Metaplugin's sidechain input.
Alternatively, you can save the node graph as a Metaplugin preset by clicking the User presets tab, then click Save new preset. This will save all the parameters and connections for the plugins in your diagram and can reduce the time needed to setup Metaplugin in a new project.
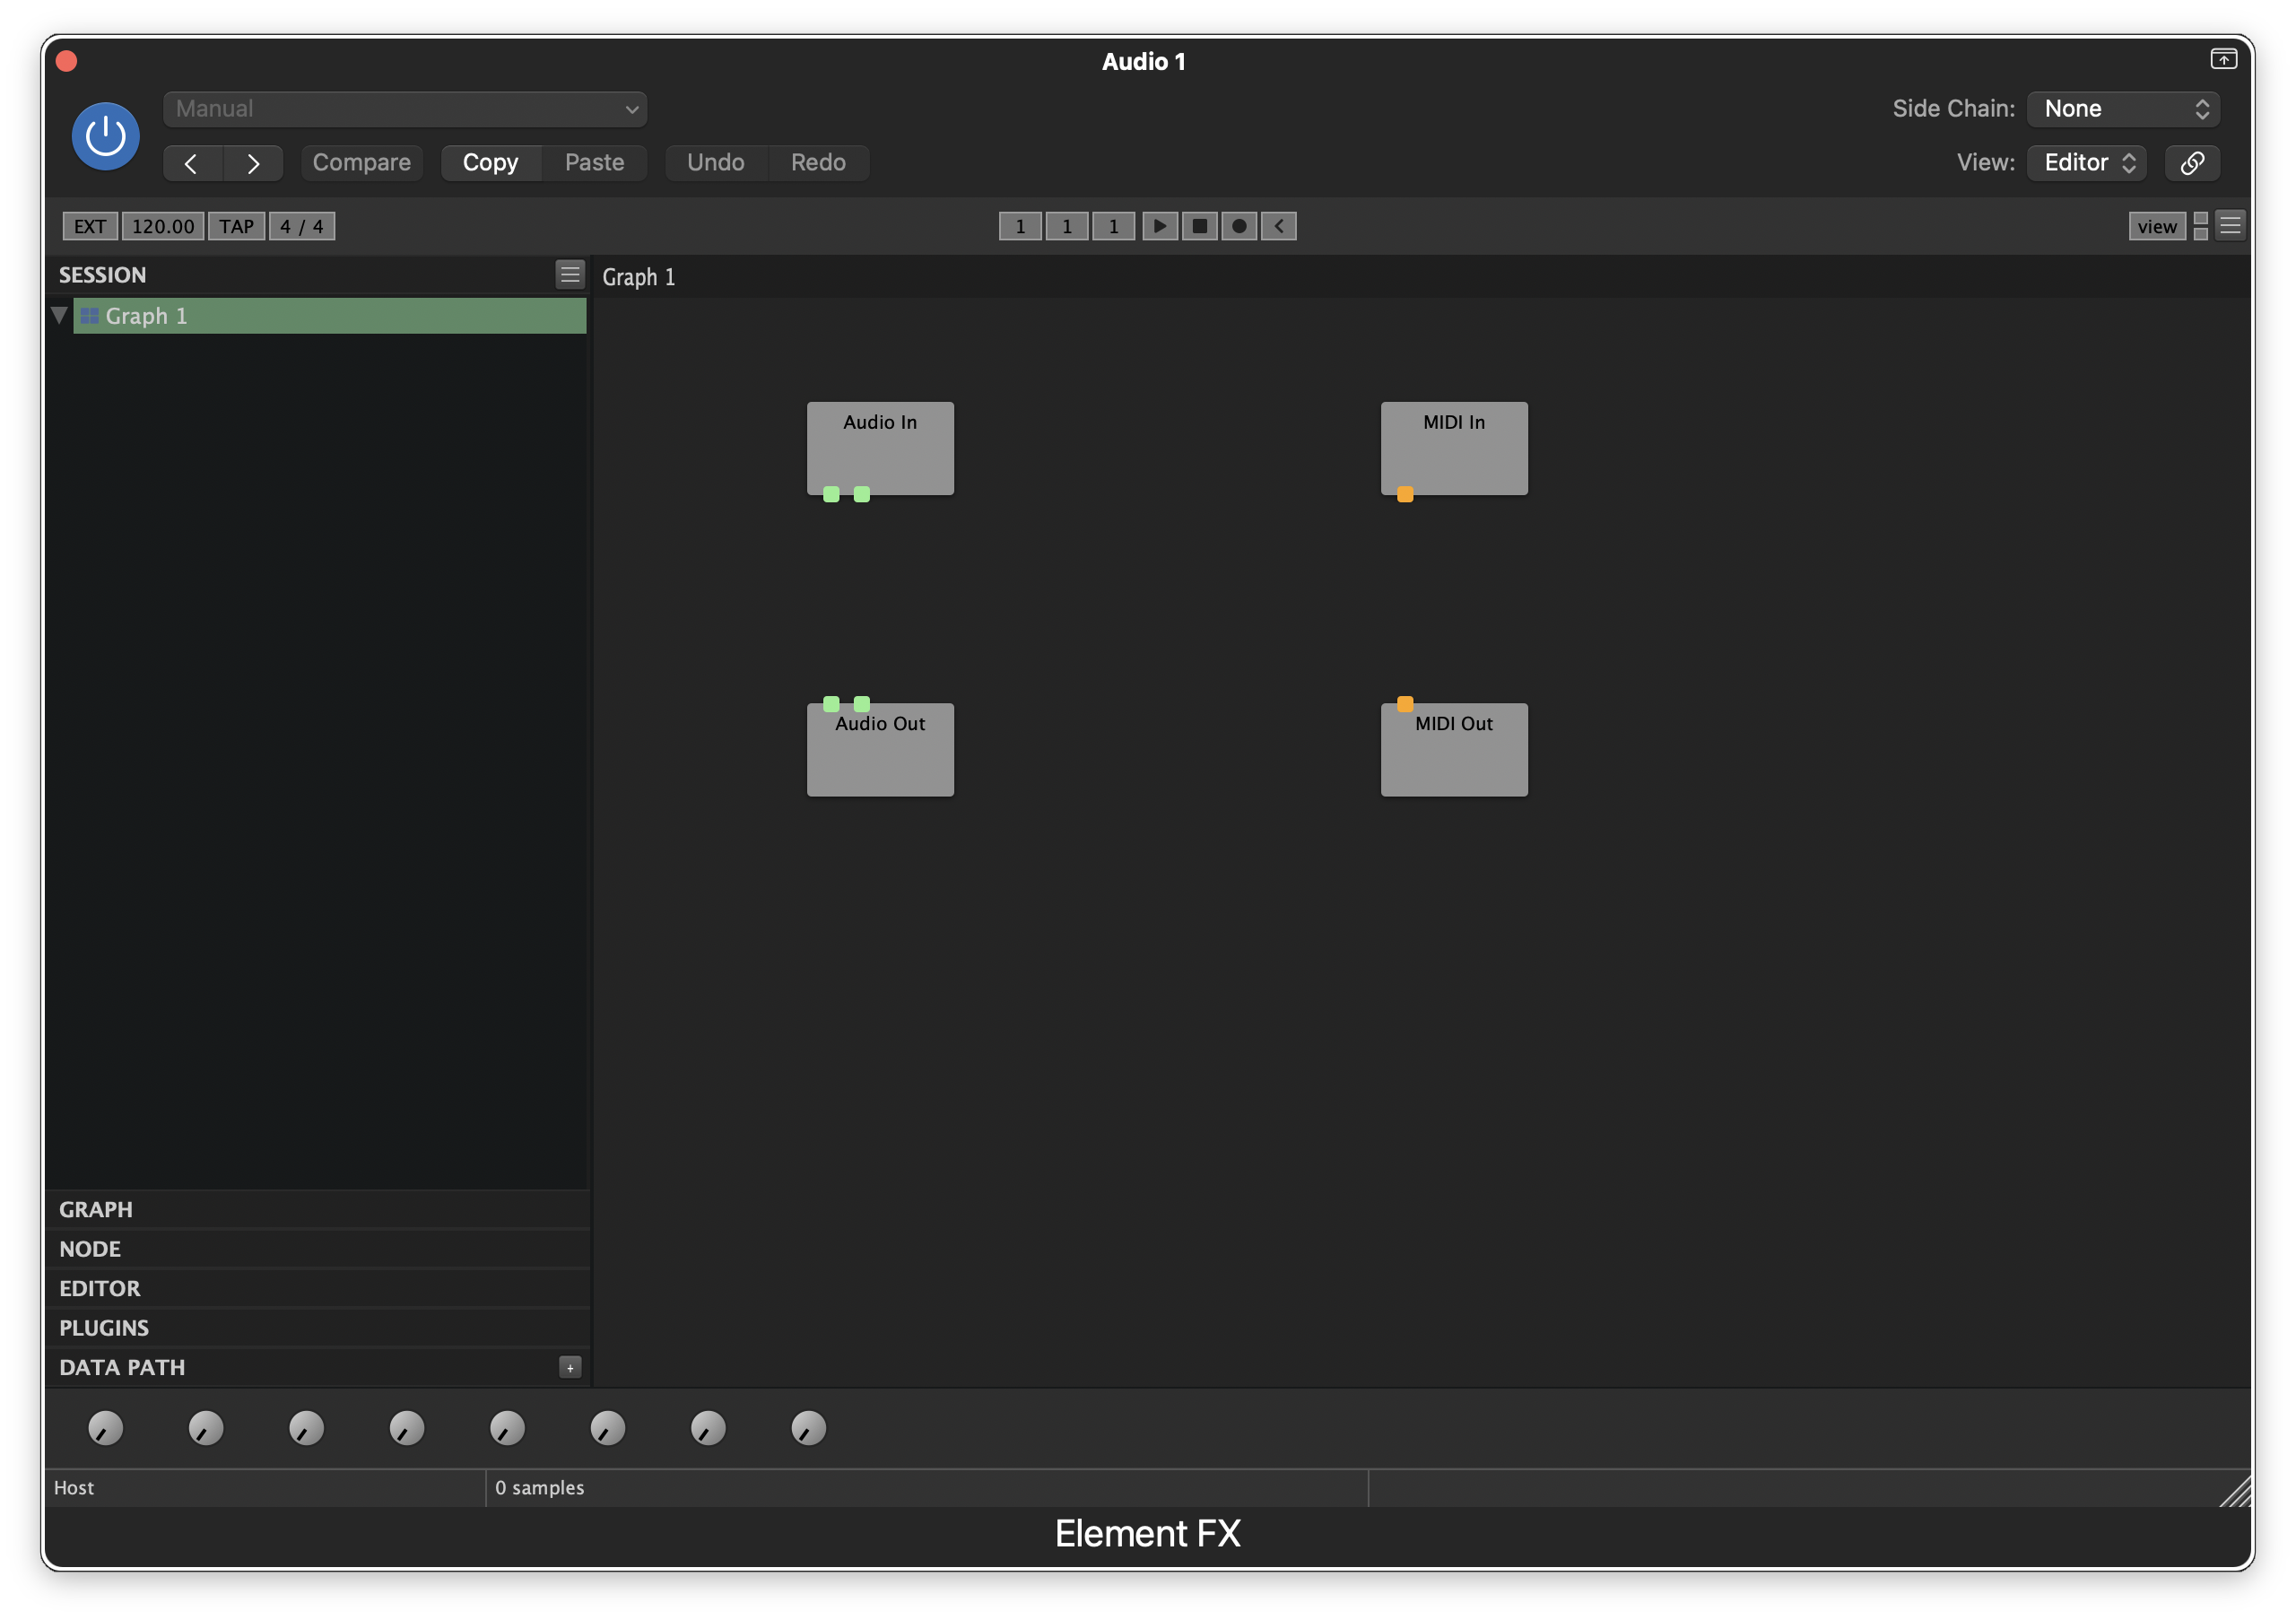
To accomplish this, we will insert an instance of Element as the first Audio FX on each track. When added to a track, Element will appear like the following:
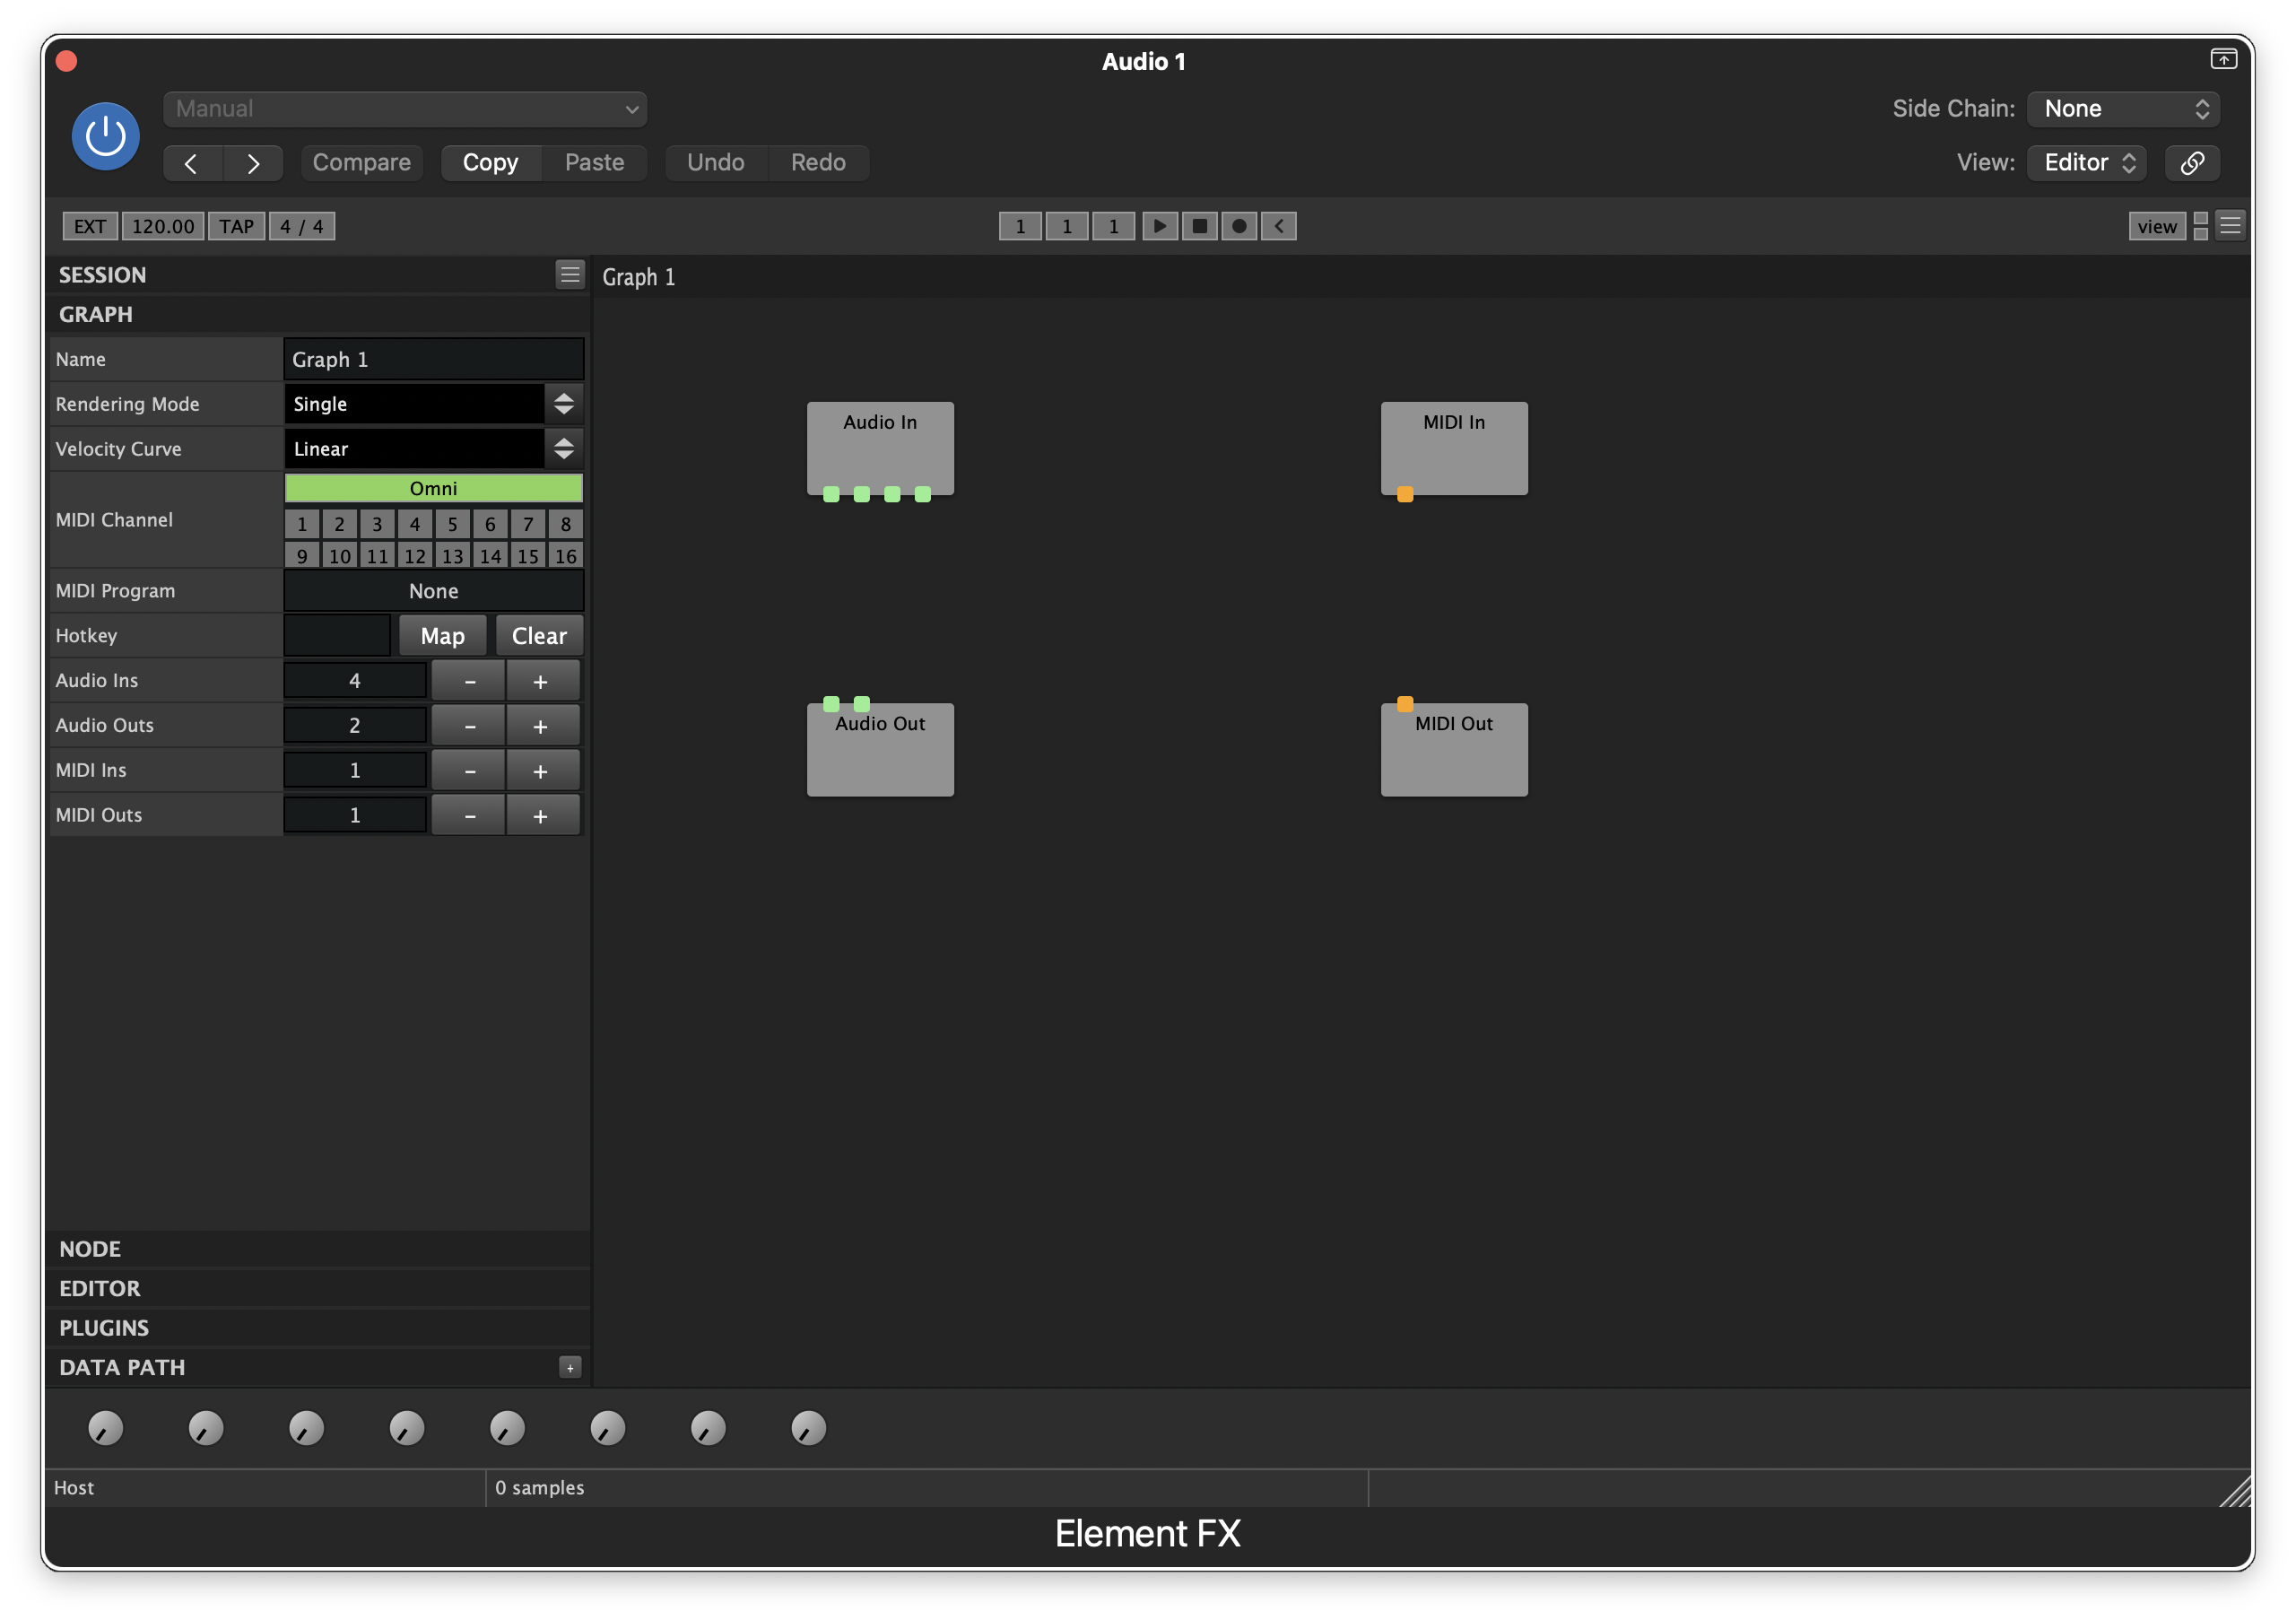
To make use of the synchronization tone, we are going to route the track's normal audio stream into the four-channel mixer, along with the plugin's sidechain input. By default, Element only has two input pins, so we must add two more pins to accept a sidechain input. To do this, double-click the GRAPH tab on the left side of the plugin. Then, click the plus button (+) next to Audio Ins until it shows a value of 4. The Audio In node will update and should now have 4 pins:
Next, right-click in the grey area of the plugin, hover over Element, and click the Audio Mixer option. This will add a four-channel mixer to the node graph:
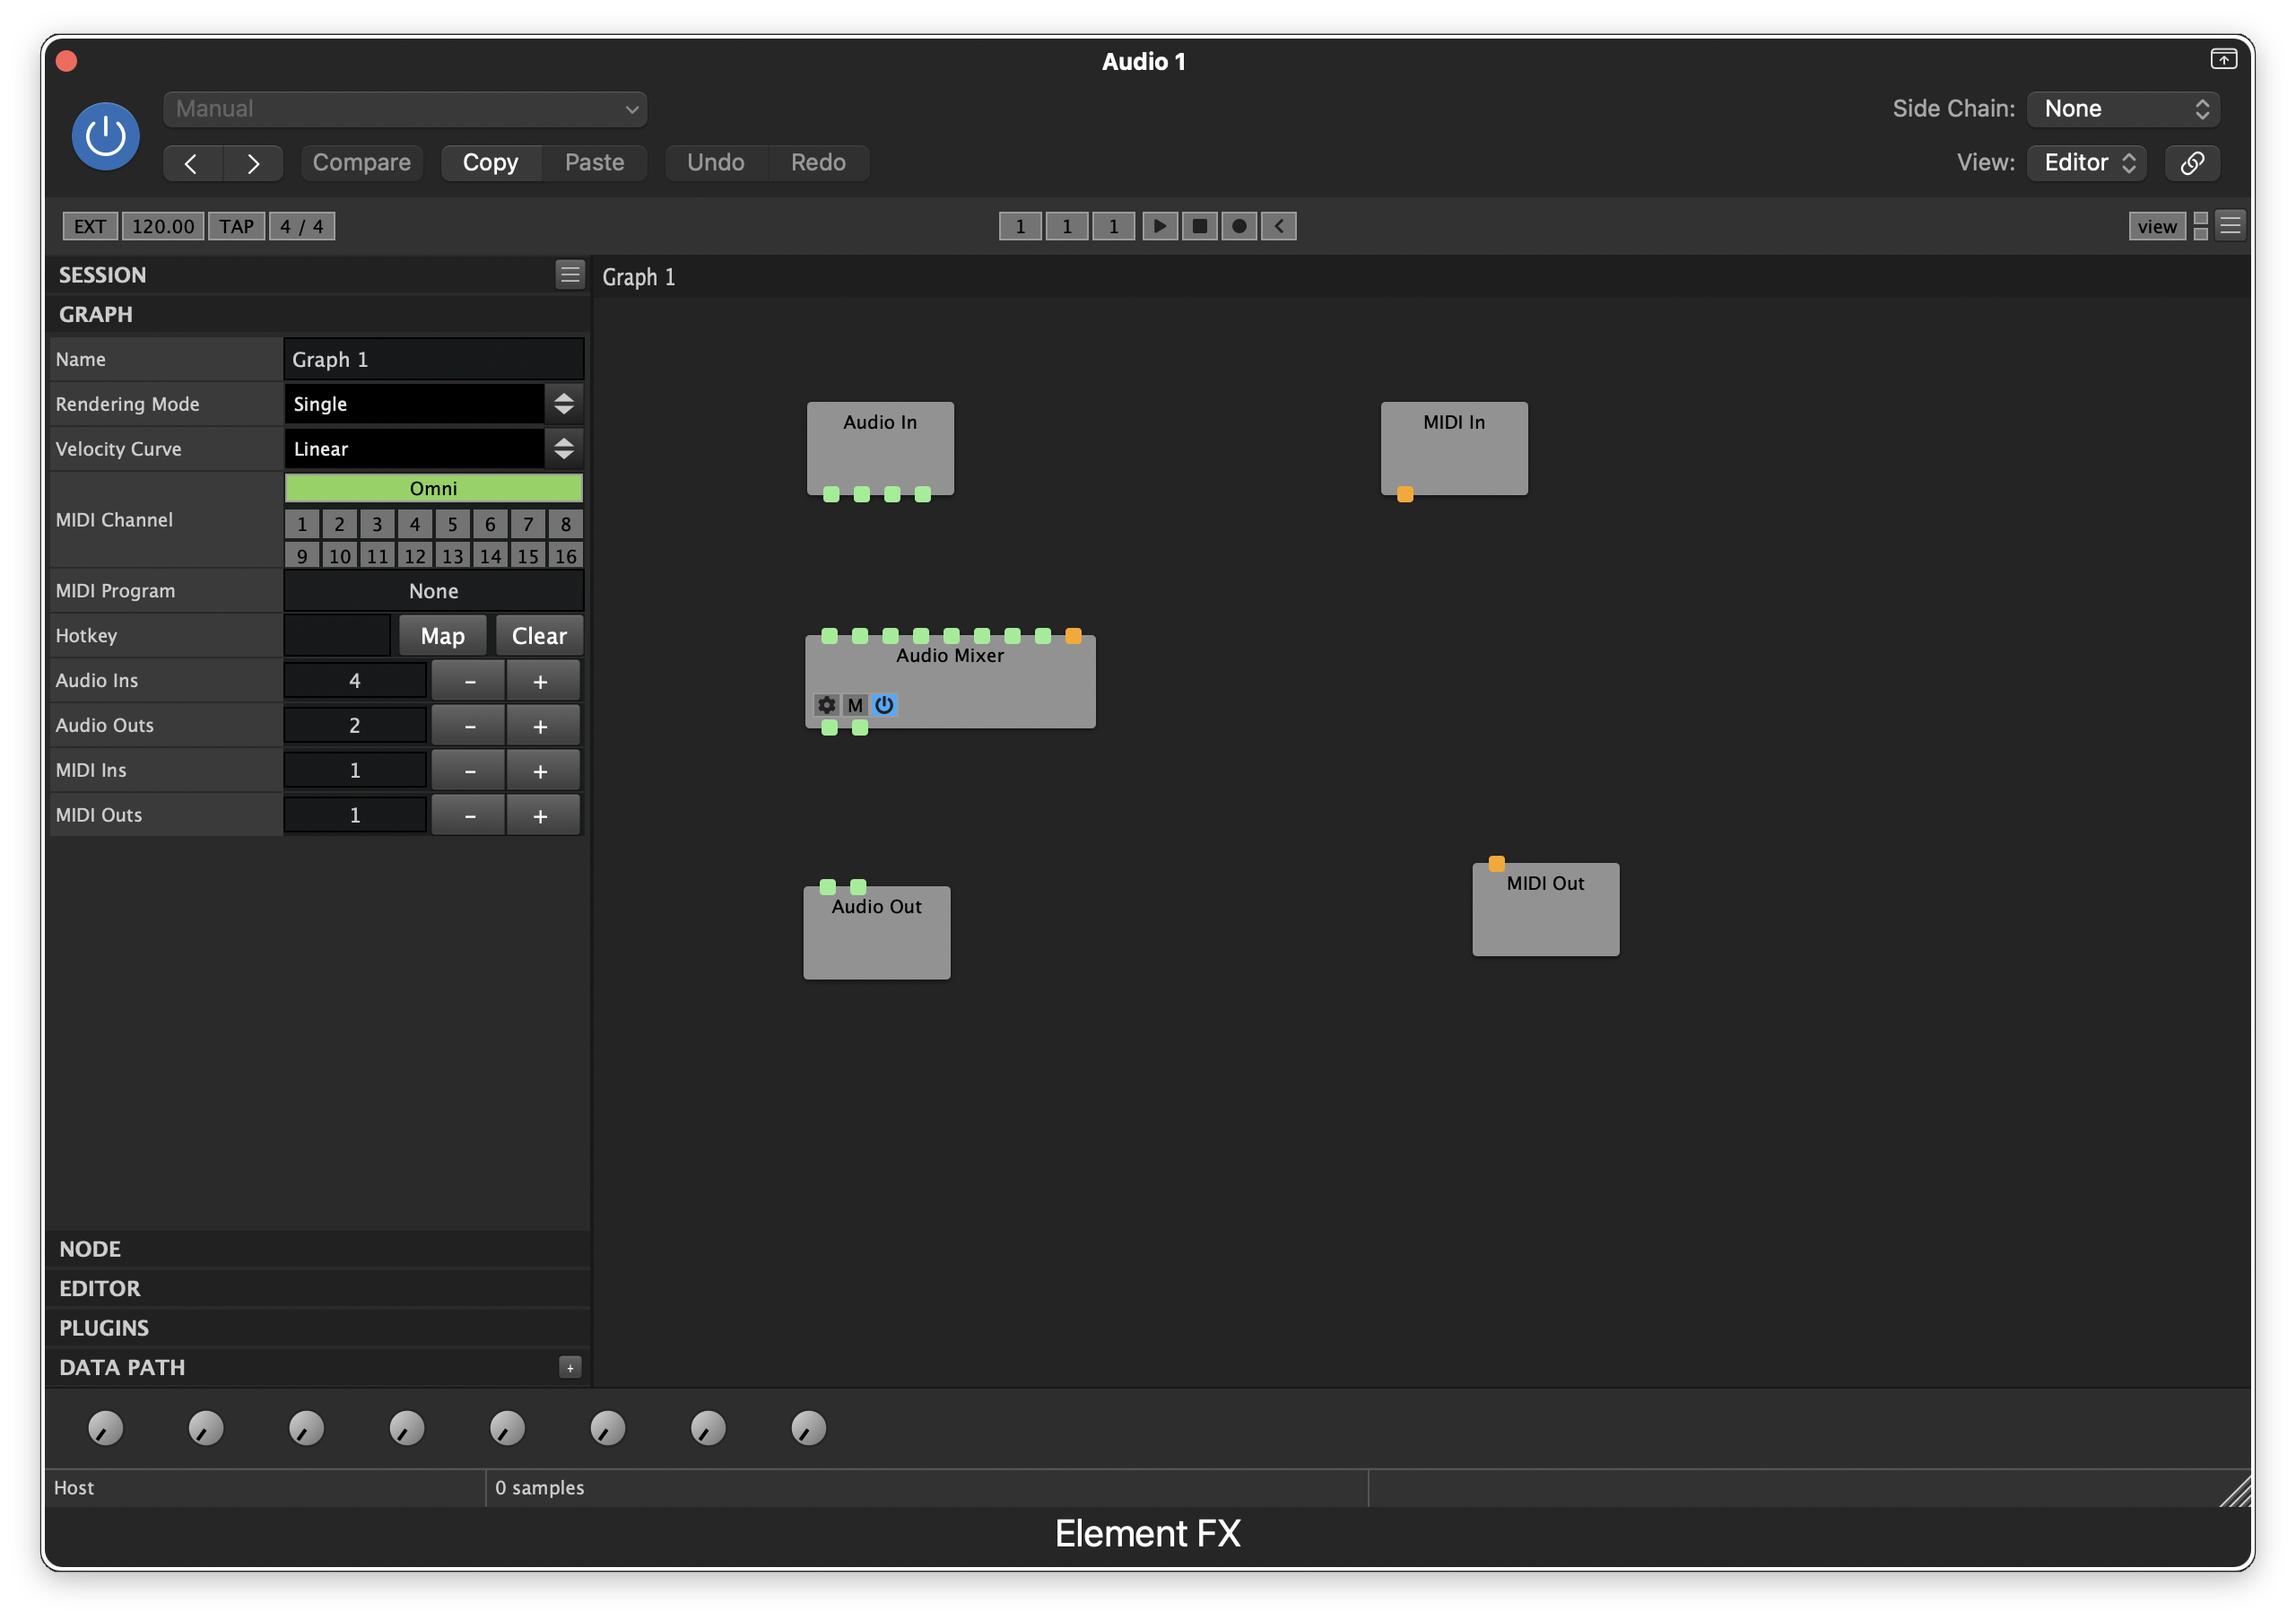
We can now connect the four pins on the Audio In node (from left to right, pins 1-2 are the plugin's main input audio, pins 3-4 are the sidechain input) to the first four input pins of the Audio Mixer node. Then, connect the output pins of the Audio Mixer node to the pins of the Audio Out node. When connected, Element should look like the following:

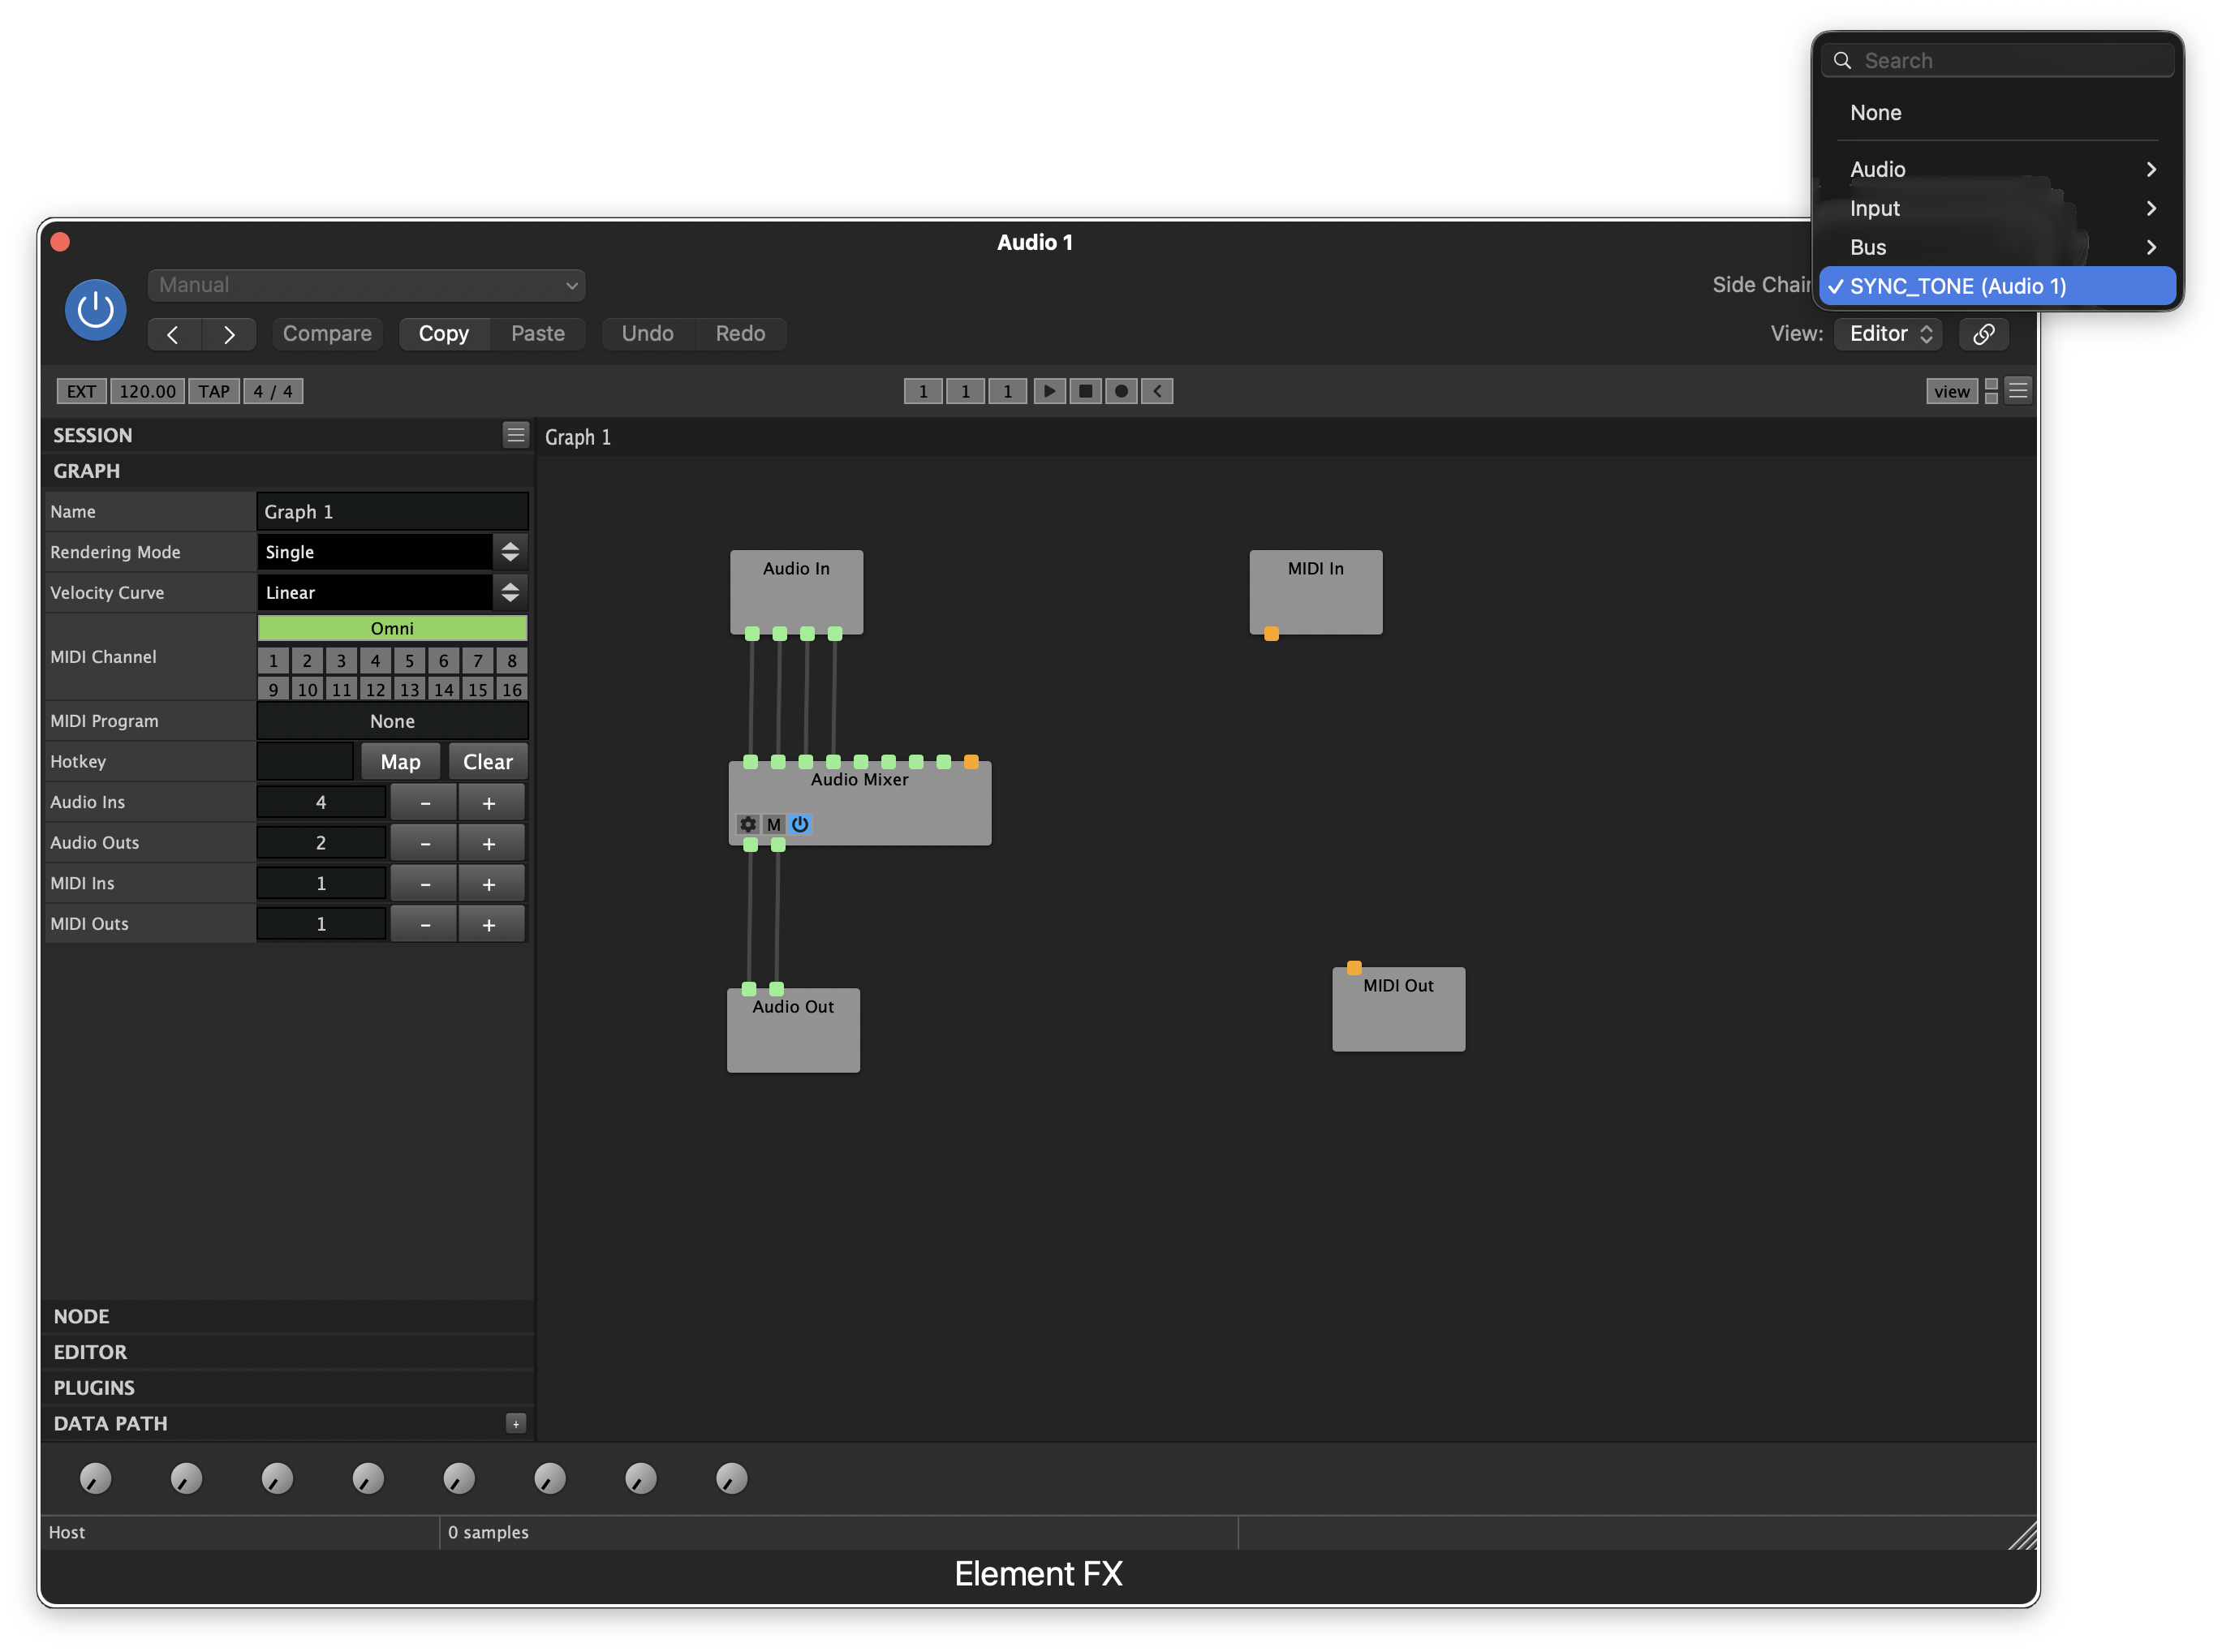
Before we can adjust the mixer, we need to connect the synchronization tone to Element as its sidechain input:
Once SYNC_TONE is connected as the sidechain input, start and stop playback in the DAW one time to wake the track. Note that Element has its own set of transport controls inside the plugin and these are not connected to Logic. You will need to be sure to click out of or close Element before starting and stopping playback.
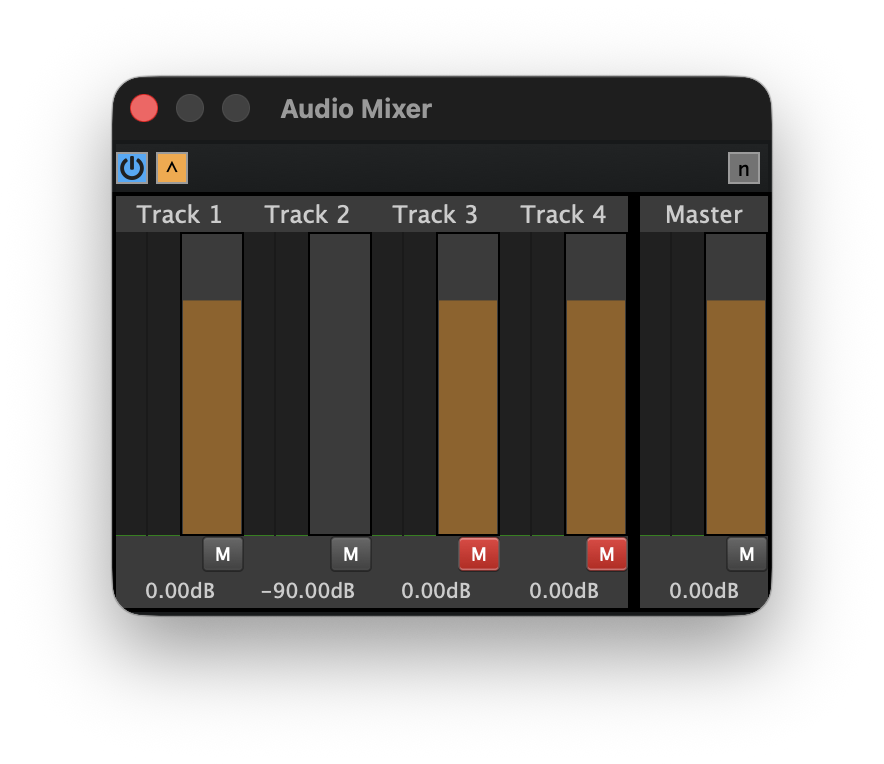
Next, double-click the Audio Mixer node to open the mixer controls. Since we are only using the first two channels, we can mute the third and fourth channels. Additionally, we can leverage the mixer's level control to attenuate channel 2 by -90 dB:
This will reduce the level of the sidechain input by an additional 90 dB for a cumulative attenuation of -282 dB.
This node graph is the key to enabling use of THS in Logic Pro. By making Elements's sidechain input part of the plugin's main output path, then setting the SYNC_TONE as the sidechain input, all sound passing through Element will be mixed with the synchronization tone. This specific configuration is what "tricks" Logic into keeping the channel awake and active for processing at all times.
Adding Element to Other Tracks
Once you have created and configured the first instance of Element, you can quickly add it to other tracks by holding Option (⌥), then clicking and dragging Element from one track to another. This will duplicate the node graph you previously created and automatically assign the SYNC_TONE track as Element's sidechain input.
Alternatively, you can save the node graph as a Element preset clicking the hamburger menu icon in the top right corner of the plugin, then click Save Session As.... This will save all the parameters and connections for the plugins in your diagram and can reduce the time needed to setup Element in a new project.